
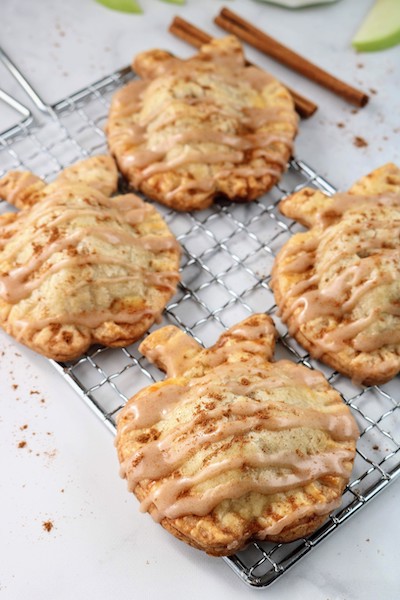
Mini Apple Hand Pies
Apple pies are a classic dessert, and one of the most well known desserts in America. We created Mini Apple Hand Pies so they taste like a classic pie that fits in your hand. This is an easy to make dessert with a simple apple filling made of diced apples, brown sugar, cinnamon, butter, and a flakey buttery pie crust.
This post may contain affiliate links. Read my privacy policy.
The kids had such a blast making these hand held apple pies. We all agreed on these adorable little apple shapes, which is why they’re the perfect Mini Apple Hand Pies. When I need to decide on what to bake with the kids, I keep in mind that we need to make something that will keep their attention.
This recipe was the perfect choice to keep them busy. Lots of fun steps, like rolling the dough, using the cookie cut out, dicing the apples, licking their fingers, and getting flour all over themselves. I have to say it was fun to watch them.
WHAT IS A HAND PIE?
A hand pie is a pastry made into a desired shape that fits in your hand. It can be filled with a yummy sweet, or savory filling. They’re usually made of pie crust, with a filling inside.
There’s a bottom dough layer, filling in the middle, and a top dough layer. Although, some hand pies are made with one piece of dough that is folded over, then crimped around the edges so the filling won’t run out.
STEPS TO MAKE MINI APPLE HAND PIES

HOW TO MAKE MINI APPLE HAND PIES
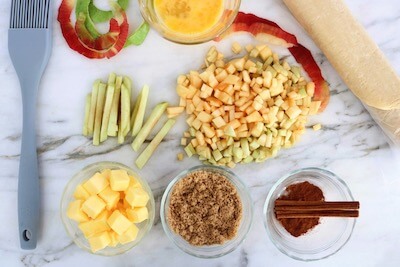
You will want gather, measure, and prep all the ingredients. It’s best to be prepared for the hand pies while you’re following the recipe.
THE YUMMY FILLING
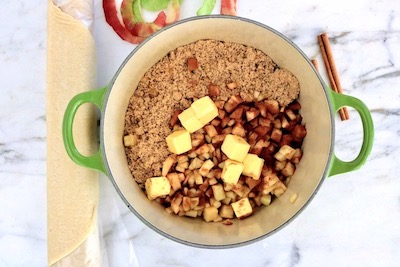
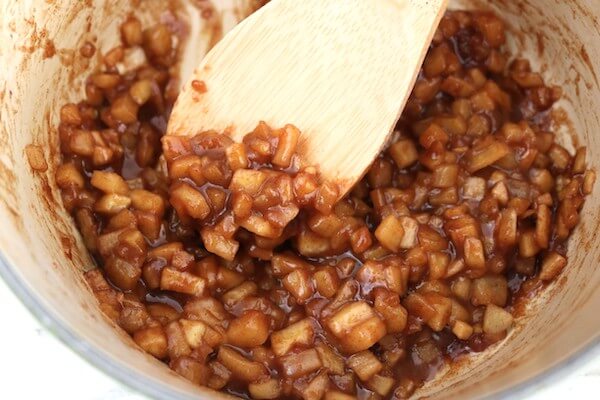
Grab a pot, and on medium heat add the diced apples, brown sugar, cinnamon, and butter. Cook on medium heat until it starts to bubble, and thicken. About 15 minutes. If the juices are runny, add a teaspoon of flour to thicken, stir and cook for 1-2 minutes. Add more if needed, and repeat step. Remove from heat, and let cool.
Cooking the filling is one of my favorite steps, because the whole house smells so good. It’s sweet, with the cinnamon aroma.
ROLLING OUT THE DOUGH
I think this could be one of the kids favorite steps. It’s physical, and they get instant reward. Also, it’s what make the apple hand pies.
Place the apple cut outs on a plate, and into the refrigerator to keep cold. Re-roll the remaining dough, and repeat steps. Be sure to have an even number for the top and bottom of the hand pies. (about 16 total)

THE ASSEMBLY
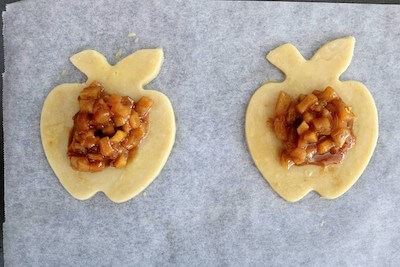
Place the apple cut outs on the parchment paper about 2″ apart. Spoon 1 tablespoon of the filling into the middle of each one. Then dip the pastry brush into the egg wash, and brush the inside edge going around the filling. (This will keep the edges sealed.)
Next, place the top apple cut outs over the filling, lining the edges up so the shape seals evenly. Gently press around the edges, and pressing out the edges any air bubbles. Then, crimp the edges with a fork.
I recommend chilling the pies after assembly, and before baking so the dough is chilled. This will help the pies hold their shape when baking.
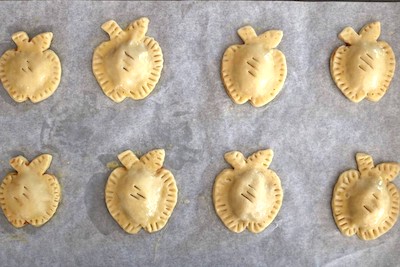
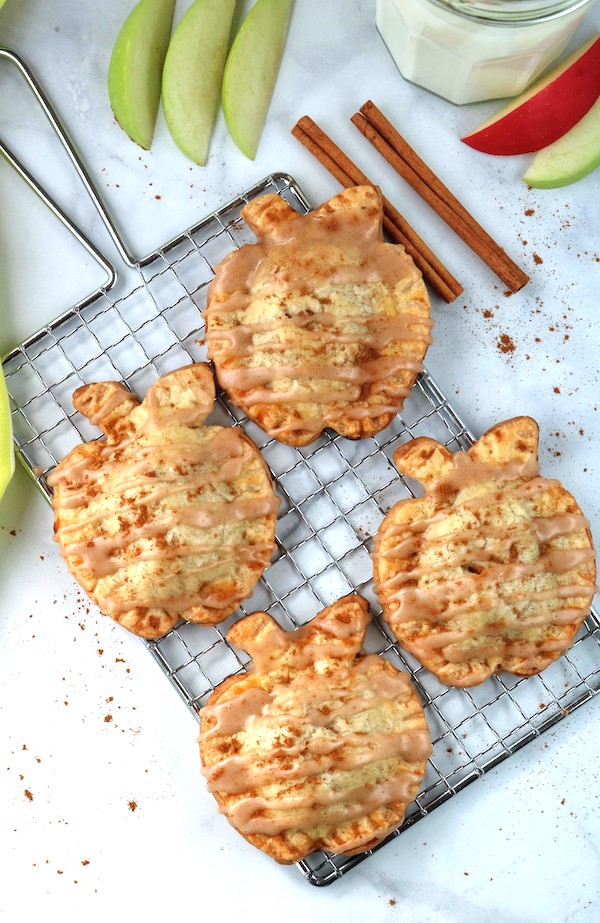
To achieve the shiny golden color on the hand pies, then brush the tops and edges with the egg wash. Make sure to vent the top to let the steam out by either poking the tops with a for or make a few small slits with a knife.
GLAZING THE HAND PIES
The glaze is really easy to make, and only 3 ingredients. In a small-medium size bowl add the powdered sugar, milk, and cinnamon. Your glaze should be thick, but run off the spoon.
Once the hand pies have been baked, and cooked then it’s time for the kids to have more fun. Glazing the pies!
While the kids a re holding the glaze, then you may need to guide their hands back and fourth over the pies to show them the motion.
WHAT ARE THE BEST APPLES TO MAKE A HAND PIE?
There’s a long list of apple varieties. A delicious pie is a mix of tart and sweet apples, and it’s best to choose firm apples. This way the filling won’t become mushy after being cooked. Our personal favorite is a combination or granny smith, and honeycrisp apples.
Here’s a short list of other tart, sweet, and tart/sweet combination apples to consider for your pies.
TART: Granny Smith, Gravenstein, Jonathan, Suncrisp
SWEET: Crispin (Mutsu), Fuji, Golden Delicious, Jonagold
TART/SWEET: Braeburn, Honey Crisp, Pink Lady, Spigold
DO HAND PIES NEED TO BE REFRIGERATED?
Yes, hand pies should be refrigerated if they have egg, or dairy in them. If you’re making fruit pies then they won’t need to be refrigerated. Fruit pies can be stored at room temperature in an airtight container, or in the refrigerator up to 2 days.
The U.S. Department of Agriculture claims that fruit pies made with sugar and fruit can be stored at room temperature. This is because of the combination of sugar, and acid in the fruit which is sufficient to retard bacterial growth.
TIPS TO MAKE THE BEST MINI APPLE HAND PIES
-
- When placing the cookie cutter in the dough, before lifting up, give it a tiny twist side to side while pressing down. Doing this will insure that all sides of the dough are cut, and they will be easier to lift out.
- The dough needs to be cold, so the hand pie will hold the apple shape when baking. After you’ve made them, place them in the freezer 3 minutes, and refrigerator 5-7 until they feel cold and a little stiff to the touch. Then brush with the egg wash, and bake them.
- If the dough sticks to the rolling surface when lifting them, use a flat metal spatula and slide it under the dough, then slowly lift.
- Don’t over work the dough, or add too much dusting flour. It will be hard to work with, and may shrink up.
RECOMMENDED ITEMS FOR THIS RECIPE
MORE TREAT RECIPES BY BUSY LITTLE CHEFS
Share the ❤️on Pinterest!


MINI APPLE HAND PIES
Ingredients
APPLE FILLING
- 2 med granny & honeycrisp apples, peeled, cored, and diced (about 2 cups) (ok to choose your favorite firm varietal)
- 2 tablespoons butter
- 1-2 teaspoons cinnamon
- 1/4 cup brown sugar
- 2 teaspoons flour (this is use to thicken the the filling)
- 1 box pre-made pie dough (includes 2 per box)
- 1/2 cup all purpose flour (this is to sprinkle on the rolling surface to prevent dough from sticking.
CINNAMON GLAZE
- 1 cup powdered sugar
- 2 tablespoons milk
- 1 1/2 teaspoons ground cinnamon
EGG WASH
- 1 egg
- 1 tablespoon water
Instructions
- Gather all the ingredients, and get everything measured and prepped. You will want the pre-made pie dough to be defrosted, unless it's homemade. Dough should be cold.
- Preheat oven to 350°F, and line a cookie sheet with parchment paper. Set aside.
- Heat a medium pot, add the diced apples, brown sugar, cinnamon, and butter, and cook on medium heat until it starts to bubble, and thicken. About 15 minutes. If the juices are runny, add a teaspoon of flour to thicken, stir and cook for 1-2 minutes. Add more if needed, and repeat step. Remove from heat, and let cool.
- Roll out the pie crust on a lightly floured surface. Then press the apple cookie cutter into the dough. Place the apple cut outs on a plate, and into the refrigerator to keep cold. Re-roll the remaining dough, and repeat steps. Be sure to have an even number for the top and bottom of the hand pies. (about 16 total)
- Place the apple cut outs on the parchment paper about 2" apart. Spoon 1 tablespoon of the filling into the middle of each one. Then dip the pastry brush into the egg wash, and brush the inside edge going around the filling. (This will keep the edges sealed.)
- Next, place the top apple cut outs over the filling, lining the edges up so the shape seals evenly. Gently press around the edges, and pressing out the edges any air bubbles. Then, crimp the edges with a fork.
- Again dip the pastry brush in the egg wash, and brush the tops and edges of the hand pie. With a knife make 3 small slits on the top of the pie, or poke a couple times with a fork for venting.
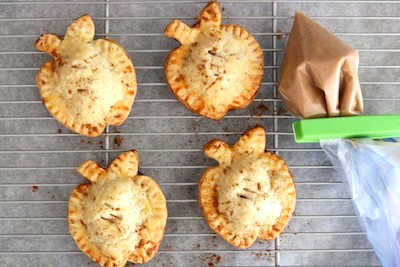
- Place in oven and bake 12-15 minutes, or until golden brown around the edges. Remove from oven, and transfer them to a cooling rack.
- Cinnamon Glaze Instructions: In a medium bowl, add all the powder sugar, milk, and cinnamon, then stir until well mixed. If the glaze is stiff, add more milk a little at a time. It should be thick, but run off the spoon.
- Pour or spoon the glaze into a piping bag, or a sandwich size ziplock baggie. Make sure glaze is at the tip of the baggie. Tie off the other end with a rubber band, or clip. Then snip a a very small piece of the tip off with scissors, then squeeze to test how much comes out. (Do this in small steps if needed, you don't want to cut too much off, or the glaze will run out.)
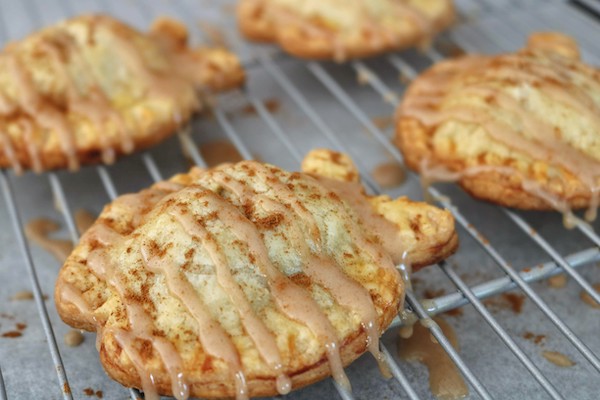
- Once cooled, place the rack with hand pies over parchment paper and drizzle the glaze over the pies in a back and fourth motion go across them. Let them dry, and the glaze will become firm. Once they're dry, they will be ready to eat!!


2 Comments
Leave your reply.